A Response to the “Open Letter”
When I logged in to our web content today, I was surprised to find a very long comment posted under our Open Letter blog post. After reading through the content I got very excited and contacted the writer to enquire if I could re-post his comments as a full blog post. He gives good advice on how to use and mold the Orthoplast that Robohand use for making our mechanical devices and I think this will aid many of you that are trying this for the first time.
Crispin Miller, an independent biomedical design professional has this to say:
“I have some tips to offer about forming Orthoplast, the splint/socket material you shape by softening it in hot water. (This stuff:
http://www.medical-supplies-and-equipment.com/product_more.wcs?pid=00001325
– though I don’t know this particular vendor.)
I worked intensively with this material for several months, making specialized splints and mounts for biomechanics experiments I conducted for my master’s thesis on prosthesis design.
I found it to be an extremely adaptable material, but this same versatility means that it takes practice and attention to control what shape you get. This was underscored to me ten years later when I found myself on the other side of the counter — getting fitted with a splint after I’d hurt my hand — and the young man making it had not been adequately trained for forming the material. I had to go home and re-mold the splint myself, to get rid of just such a pressure point as therapists Esham, Poole, and Scheuber are warning us against.
Here are some things I’ve learned:
1. To form a splint around any part of the body other than perhaps the straight part of the forearm, you have to create some “compound curvatures” — requiring stretched areas in the material. Otherwise when you try to put it around areas which narrow and flare (such as the transition from forearm to wrist to hand), it will form big folds or wrinkles, departing from the natural shape of the body part underneath (think of how some flexible-but-not-stretchy leather would behave) — and these rumples will have an obvious risk of being pressure points. This was the trouble with the splint I had to fix.
To avoid these mis-fitting areas takes attention and practice. Perhaps highly skilled practitioners can do it by themselves (as a single person working), but in my experience a good job on something like a whole-arm splint also required having four hands on the work. One forgiving aspect is that you can reheat the material repeatedly, so as to proceed in multiple steps — on the first heating, softening the material and wrapping it on, you probably just learn what size to trim it to. Maybe also you can see where you’ll need to stretch it, and maybe get it suitably stretched on the next heating. And if you’re lucky, then that time you may still have time also to take the piece, once stretched, and get it suitably wrapped around the limb, before it cools and stiffens up. Or you may run out of time and need to throw it back in the hot water, which means you lose some of your shaping work (but maybe not too much of the stretch) — and then you try again, making sure to position it the same as before so that the trimmed edges and the stretched area(s) are still where you need them to be.
2. We found that the work was easier if you did some extra temperature manipulation of the material –
– the simplest part of this was that once you do have the piece formed the way you like it, and you’d like to go ahead and firm it up, you can sponge it with cold water and then you don’t have to keep sitting there holding it in place for so long. So we prepared both a hot-water dishpan and a cold-water dishpan, with big sponges in both, and if we needed to buy extra time on some part of the piece, we could keep it warm with the warm sponge, and once we wanted to solidify it we could cool it with the cold sponge. Typically we had three hands holding the material and the fourth hand applying the sponge. There’s a significant time lag you need to expect, for either heating or cooling, because the material takes time to change its temperature all the way through.
– for the initial stretching, it helps to have the material soaked in hotter water than you’d use for fitting it onto the wearer — BUT you cannot wrap it onto someone’s arm when it’s that hot! Do the stretching you need, then cool it off and check it against your own (scrubbed) skin, then wrap it on.
– One way we learned to speed this up was to sponge the wearer’s side of the hot material with a quick, uniform wipe of cold water and then wrap it on, while the rest of the material thickness was still nice and flexible — BUT this was with a fully able-bodied volunteer subject with no sensory or circulatory impairment, who could let us know if the splint was feeling too warm and should come off — so do think carefully about this approach, and test it on yourself first, to learn for example whether the interior of the material may be holding more heat than you think. If you’re working with someone who has any damage to skin, or to nerves, or to circulation, I wouldn’t use this trick.
– unless you have a thermostat-controlled water bath, never wrap any piece of heated Orthoplast onto someone without checking the material temperature against the back of your own hand first.
3. A technique I haven’t seen clinicians do, but that I’ve found invaluable, is to do finishing details by local heating afterward, with the splint off of the wearer. This lets you soften and fix small areas without losing the overall shape. Two examples of things this lets you do are:
– flare the edges, at places that would poke or dig when the limb is pressing against them;
– soften the appropriate spot on top of the wrist and poke a good outward bulge into the surface there, about an inch wide, to avoid pressure at the place where the ulna makes a lump there (a lump which varies as you twist the wrist, by the way!)
One way to do this local heating is with a workshop “heat gun” (a hair dryer on steroids), but do be careful and patient, because a heat gun can scorch the material if you try to soften it too quickly.
One extra trick with a heat gun is that you can WELD this material, face to face, if you want to apply a thickening patch or splice a bracket on, or something. One of the two pieces should be softened so it will mate tightly, and then you quickly heat both faces strongly but briefly with the heat gun and press them together.
A kinder-gentler way I found for forming finishing touches, though, was to use a small steam jet. You still have to take care not to scald yourself, but you won’t scorch the material. What I rigged up was a Pyrex flask of water on a lab hotplate, with a one-hole stopper and a bent copper tube (to send the jet sideways so I could see what I was doing). Less elegantly, you could use the spout of a pressure cooker with the pressure weight removed.
If any of this leaves you questions, I’ll try to respond –
best regards and good luck,
Crispin Miller, PhD mech. engr’g
Lincoln, Massachusetts”
Tragedy Strikes but Miracles Happen!
Meet Esethu.

Esethu is 13 years old and on the 25th December 2012 was in a horrific Taxi accident in South Africa where she was flung from the taxi through a window. Due to this accident Esethu lost her left hand completely from the wrist and her baby finger on her right hand. She also had her hip dislodged which causes her incredible pain and she battles to walk.

However, this brave young girl embraces life with a gorgeous smile and a thankful heart that she is alive, able to walk, talk and still do some of the things she could do before.
Esethu is in Grade 8 and attends a school in the Kempton Park area. She loves Maths in which she does extremely well. She has lots of friends who are incredibly supportive since her accident and when she grows up she wants to be a Civil Engineer.
Esethu and her mom Ncedeka came to see us a few weeks ago. Esethu met a young doctor at the Chris Hani Baragwanath hospital where she was being treated for her injuries. Dr Amy had heard about Robohand but because Esethu had lost her hand above the wrist and did not have the movement there to use a Robohand she wasn’t sure if we could help. But she contacted Rich anyway and they came for a consultation.
We are very proud to announce that Rich has developed Robohand further than just the wrist and it can now operate from the elbow and shoulder.
Below are the pictures documenting the creation of Robohand using the elbow to drive the mechanical device.

Creating the gauntlet

Creating the Upper gauntlet

Full gauntlets

Adding the hinges

Adding the hand to the gauntlet

Hand on the gauntlet

Fitting the entire arm

Fitting and adjusting

See that happy grin!

Rich and Esethu after a long day

Smiles all round!

Esethu and her mom with Bev and Alec who brought them to Robohand HQ
Please visit our You Tube account to see the video’s of Esethu using her Roboarm: https://www.youtube.com/channel/UCnMi2JjodBWItWmE-zdZmBw
A Hand for Junior
Meet Junior
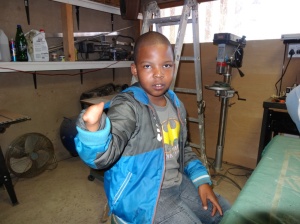
Junior
Junior and his Mom, Thandi, saw Richard’s interview on eNews (the local TV station in South Africa) a couple of months back and Junior got very excited and asked his Mom to contact us and see if there was a possibility that he could receive a hand.


We have been in discussions since then and Junior finally arrived for his fitting. He is a very quiet spoken young boy of 9 years old. He loves to play soccer (football) and tennis at school. His Mom says that he’s even played rugby.
It was a very long day as Richard could not get any measurements before Junior arrived so could not pre-print a hand (which takes about 5 hours), but luckily after Junior was measured up, Richard disassembled a hand he had in stock that was the right size so could use that for Junior.


Due to the odd shape of Junior’s hand, Richard had to do some customising for the hinges and you will see from the picture above that it bends round the top of the hand cap.
In conversation with Thandi, Junior’s Mom, she had no idea while she was pregnant that there was a problem. Like so many children born with ABS, the parents have no idea until they see their child for the very first time. No one could tell her why or what his condition was called and through all these years she felt so guilty, that she had done something wrong.
Thankfully ABS is becoming a more well know condition and more spoken about among communities.


Junior has many friends and hopefully he will now become the coolest kid at school. He has to practice extensively to utilise just his wrist to get his new hand to open and close.


Thank you to Junior and Thandi for giving Robohand this opportunity of enabling Junior to use his hand.

Watch a video of Junior using his Robohand for the very first time.
A Heartfelt “Thanks”
We at Robohand are very humbled by the response we’ve had to the Press Release done by MakerBot. We are in awe that so many people have shared, tweeted and posted all over the internet, our story and our journey.
We have had an overwhelming number of people contact us to offer their help in printing out hands for people. We appreciate the gestures and are tying to co-ordinate a “Helping Hands” database of people around the globe. Our hope is that this database will grow and grow and more people all over the world will be in a position to print hands for people.
For the enthusiast, you don’t need our permission! The files are free and available so if you know of someone that could use a hand, please extend yours, and offer them the help. This journey was never about making money but if every one person who owns a 3D printer created one hand for someone, we could make a magnitude of difference in so many lives.
Pay It Forward!
Thank you again to Annelise and the MakerBot team for your generosity and opening the world up to our idea.
Find the press release here.
Find the printable files here.

A Hand over the Ocean
Meet Xixi.

Xixi is 9 years old and was born limb different. She is adopted and was born with ABS, like so many other children all over the world. Xixi was born in Wuhan China and was adopted by the Padgett’s in 2005 where she now lives with them and her 3 older siblings, in the USA.
Xixi’s Mom, Melissa says that Xixi has not let her limb difference hinder her in any way at all. Brother Adam (age 10) and Xixi learned to tie their shoe laces together on the same day and Adam helped her to learn to ride her bike this Spring. Xixi had some balance issues in the beginning as she could not hold the handle bar, but once she got the balance right, she was off and away and spent the entire spring break on her bike.
Xixi’s Hand today
Xixi is not only academic and loves school; mostly getting straight A’s, but she draws, writes, cooks, takes Tae Kwon Do lessons, where she just earned her green belt with two stripes, and now she is starting to practice with a bow and arrow.
Home Cooked Blackberry Pie

Her Mom says that she loves to shop for clothes, shoes and purses. She likes thrift stores and clothes shops best. She has lots of friends at school and loves to have her girlfriends over as her older siblings are all boys, so she feels a bit left out being the only girl at home. One of her best friends is another girl from China who also has ABS. They were adopted the same year.
A Family Outing
Xixi loves animals, especially kittens. At home they have 5 cats. Xixi was afraid of dogs when she was very little, but she’s not afraid of any animals now (except bees). She plays with the two dogs at home as well as the hedgehog and the snake.
We at Robohand feel very lucky to bring Xixi into our family. However, this is going to be a difficult process as she lives so far away. Xixi’s Mom will need to provide us with moulds of her hand so that Richard can work out the sizing of the Robohand and the fitting of the hand cap and gauntlet.
This is also not going to be a fast process and will take many weeks up and down, until Xixi has her functioning mechanical hand.
We are very excited at the prospect of this long distance collaboration and helping to enable Xixi in her everyday life.
Thank you to the Padgett’s for contacting us and to everyone who has contributed to our project, enabling us to make these things happen.
Snail Games with the Family

I “heart” Robohand…
This fills our hearts with joy and our chests with pride!

When we receive such great positive feedback from the people we have helped it is confirmation that this is the right road we are on.
Richards days (and nights) are filled with answering the many queries from fans, from people who require assistance, the media and our sponsor Makerbot. We are fortunate to live in an age where technology allows us to Skype with people all over the world and touch the lives of so many.
We are working on our next project and as soon as we are able we will start sharing. Watch the media next week as some big things are afoot.
Thank you to everyone who has contributed in any small way to our project – we appreciate everything!
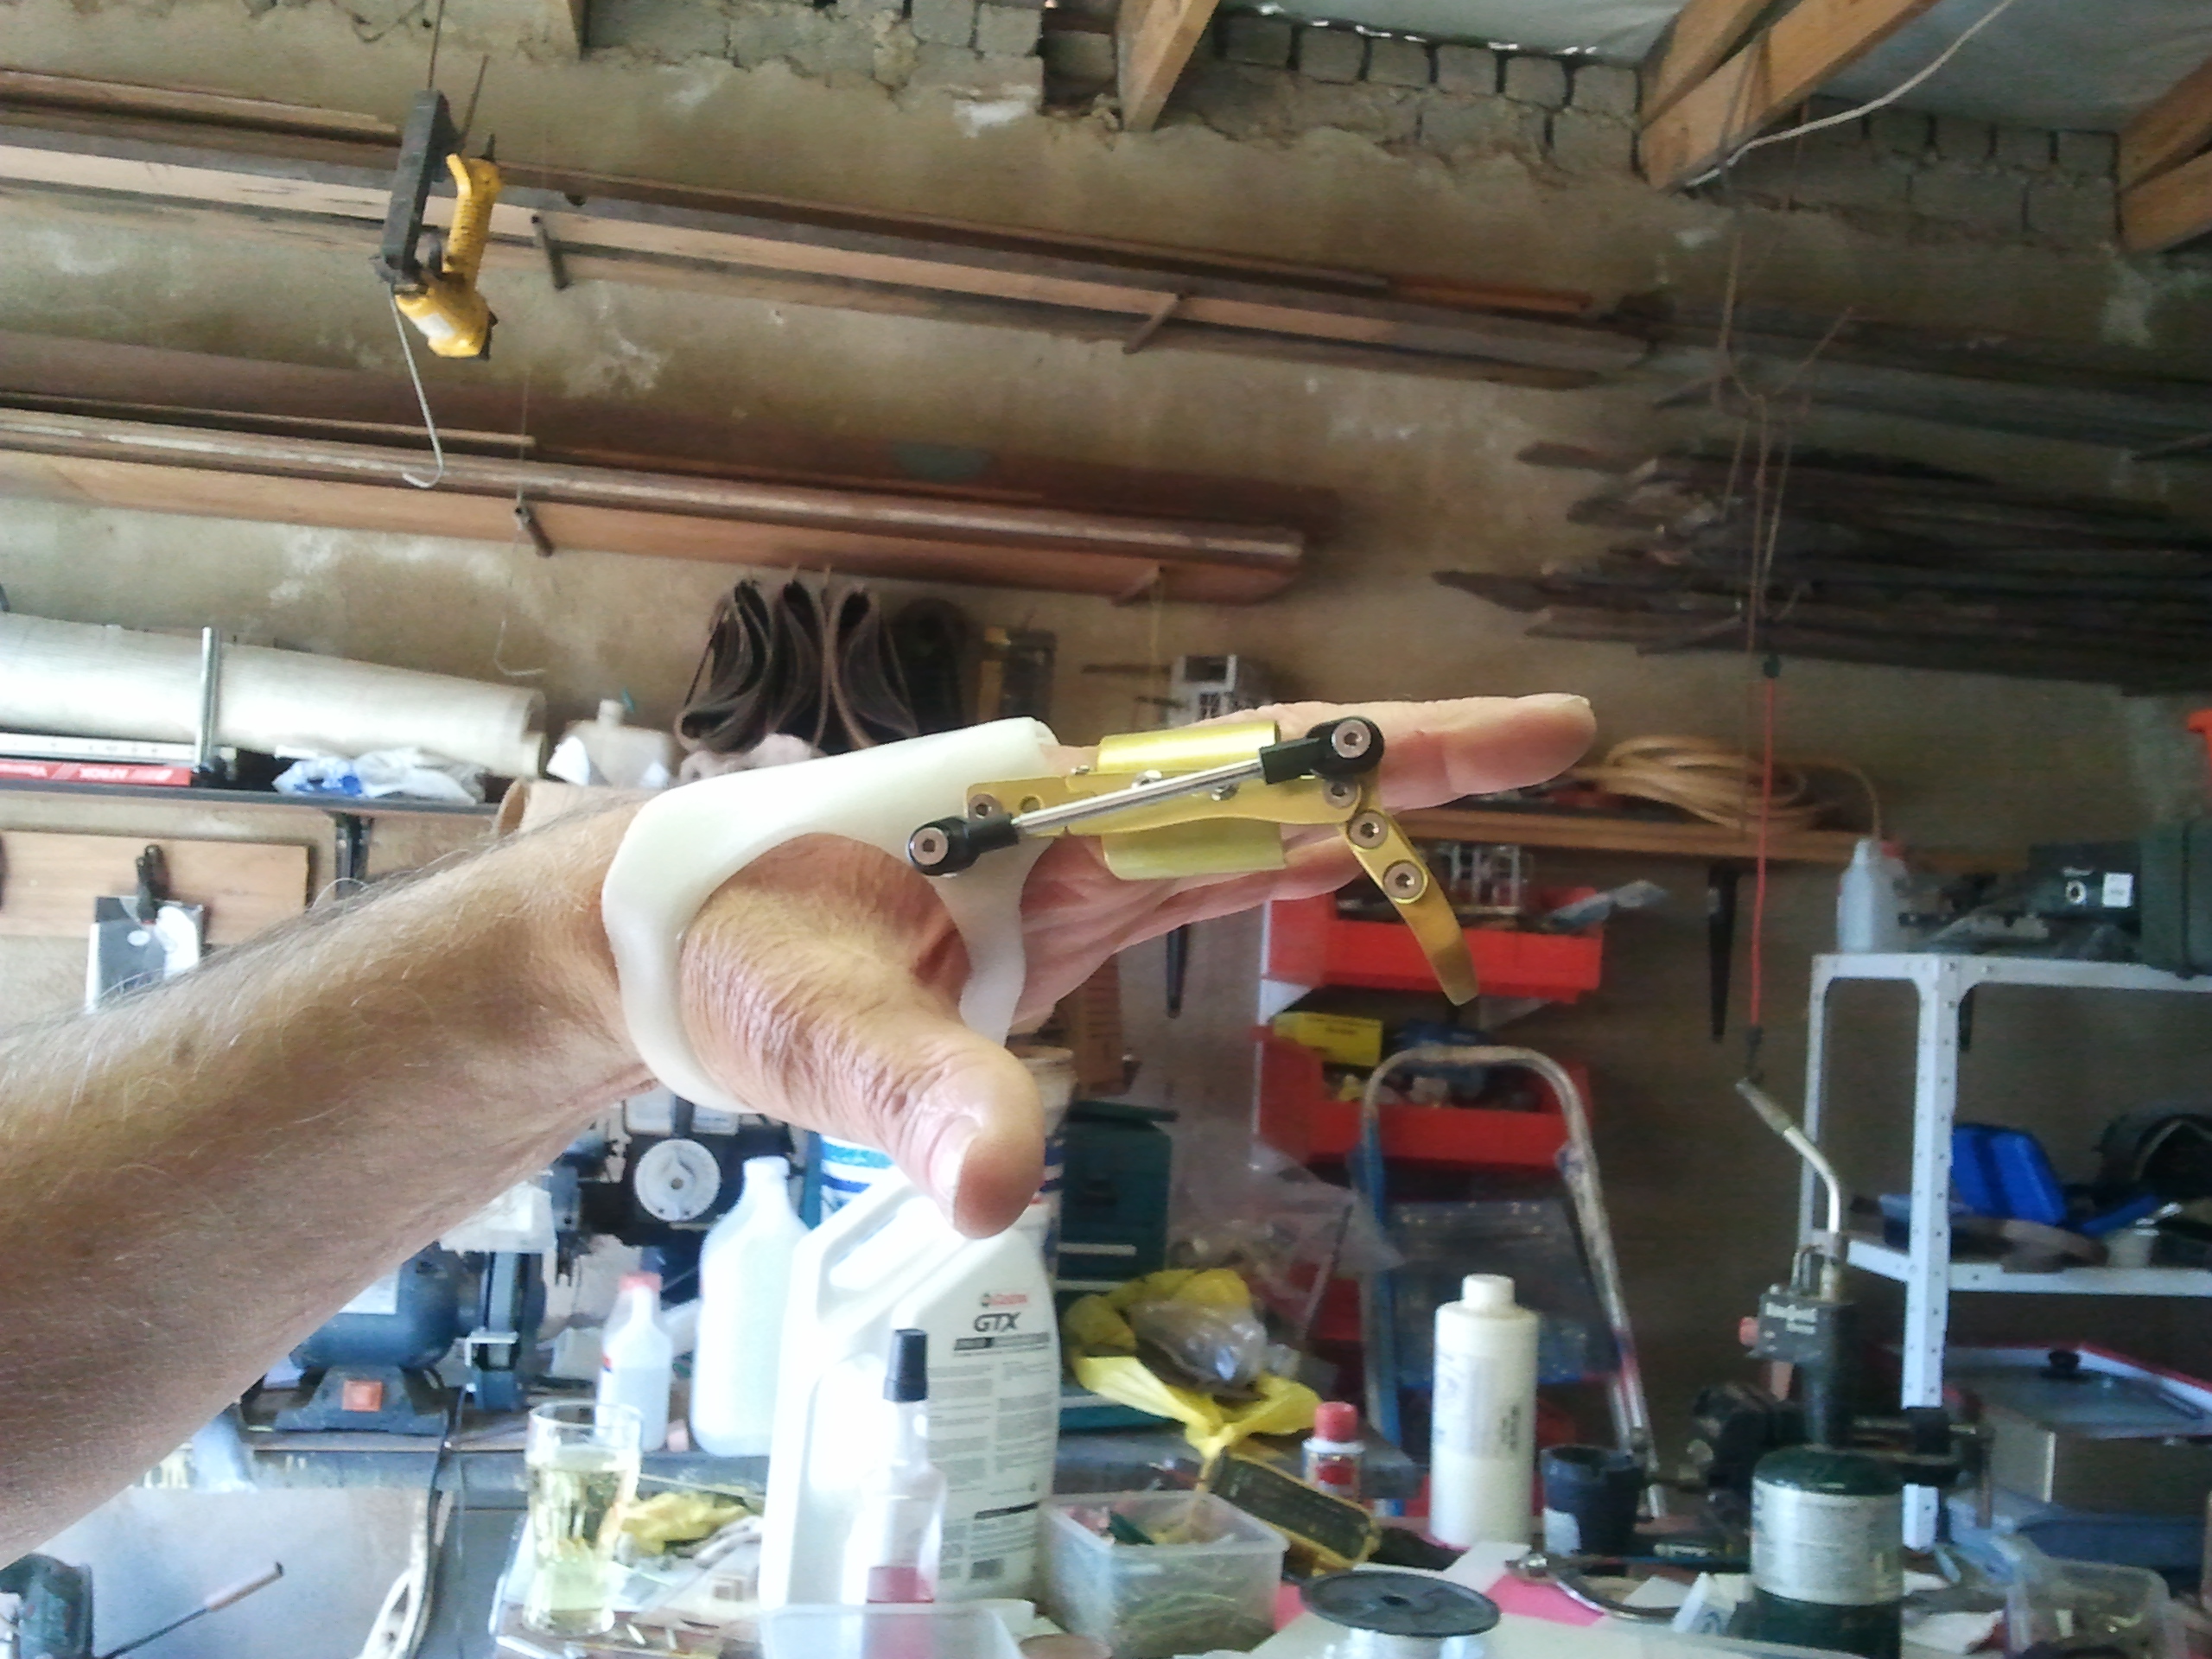
The Spider Bite that Resulted in a Robofinger
Written by Dave Phillips
I first heard about ROBOHAND in early February 2013, on Talk Radio 702 when John Robbie telephonically interviewed Richard [Rich]. I sent an Email to Rich who had lost 4 fingers whilst using a circular saw and told him of the loss of the top two segments of my left hand index finger after being bitten by a Violin spider on 28th August 2011.
I had investigated a prosthetic finger, but as my finger and hand still needed corrective surgery, I was waiting for my hand to stabilize after this surgery.
Rich telephoned me back that same day and I made an appointment to see him the next day.
He turned out to be a straight talking no nonsense family man, with a great sense of humour [which I pushed to the limit], a charming and supportive wife Beth.
Rich took measurements of my ‘stump’ and the angle of movement I was capable of and said he would work on a ‘ROBOHAND’ and contact me when it was ready.
On Sunday [no rest for the wicked] 21st April 2013 I arrived at Rich’s house where Rich assembled the prosthesis step by step. His Robohand was the first one he had produced and mine was number two.
Rich has a workshop at his house with everything he needs to produce the finished article. His workbench has dozens of spare parts for mechanical fingers.
The prosthesis is custom made one step at a time with checking measurements being taken as each step is progressed. It consists of several parts that have to be aligned correctly in order for the ‘finger’ to be functional. The ‘finger’ is straight when the ‘stump’ is straight, but as the ‘stump’ moved towards the thumb, the top of the finger curls inwards to meet the thumb giving the ‘finger’ gripping power.
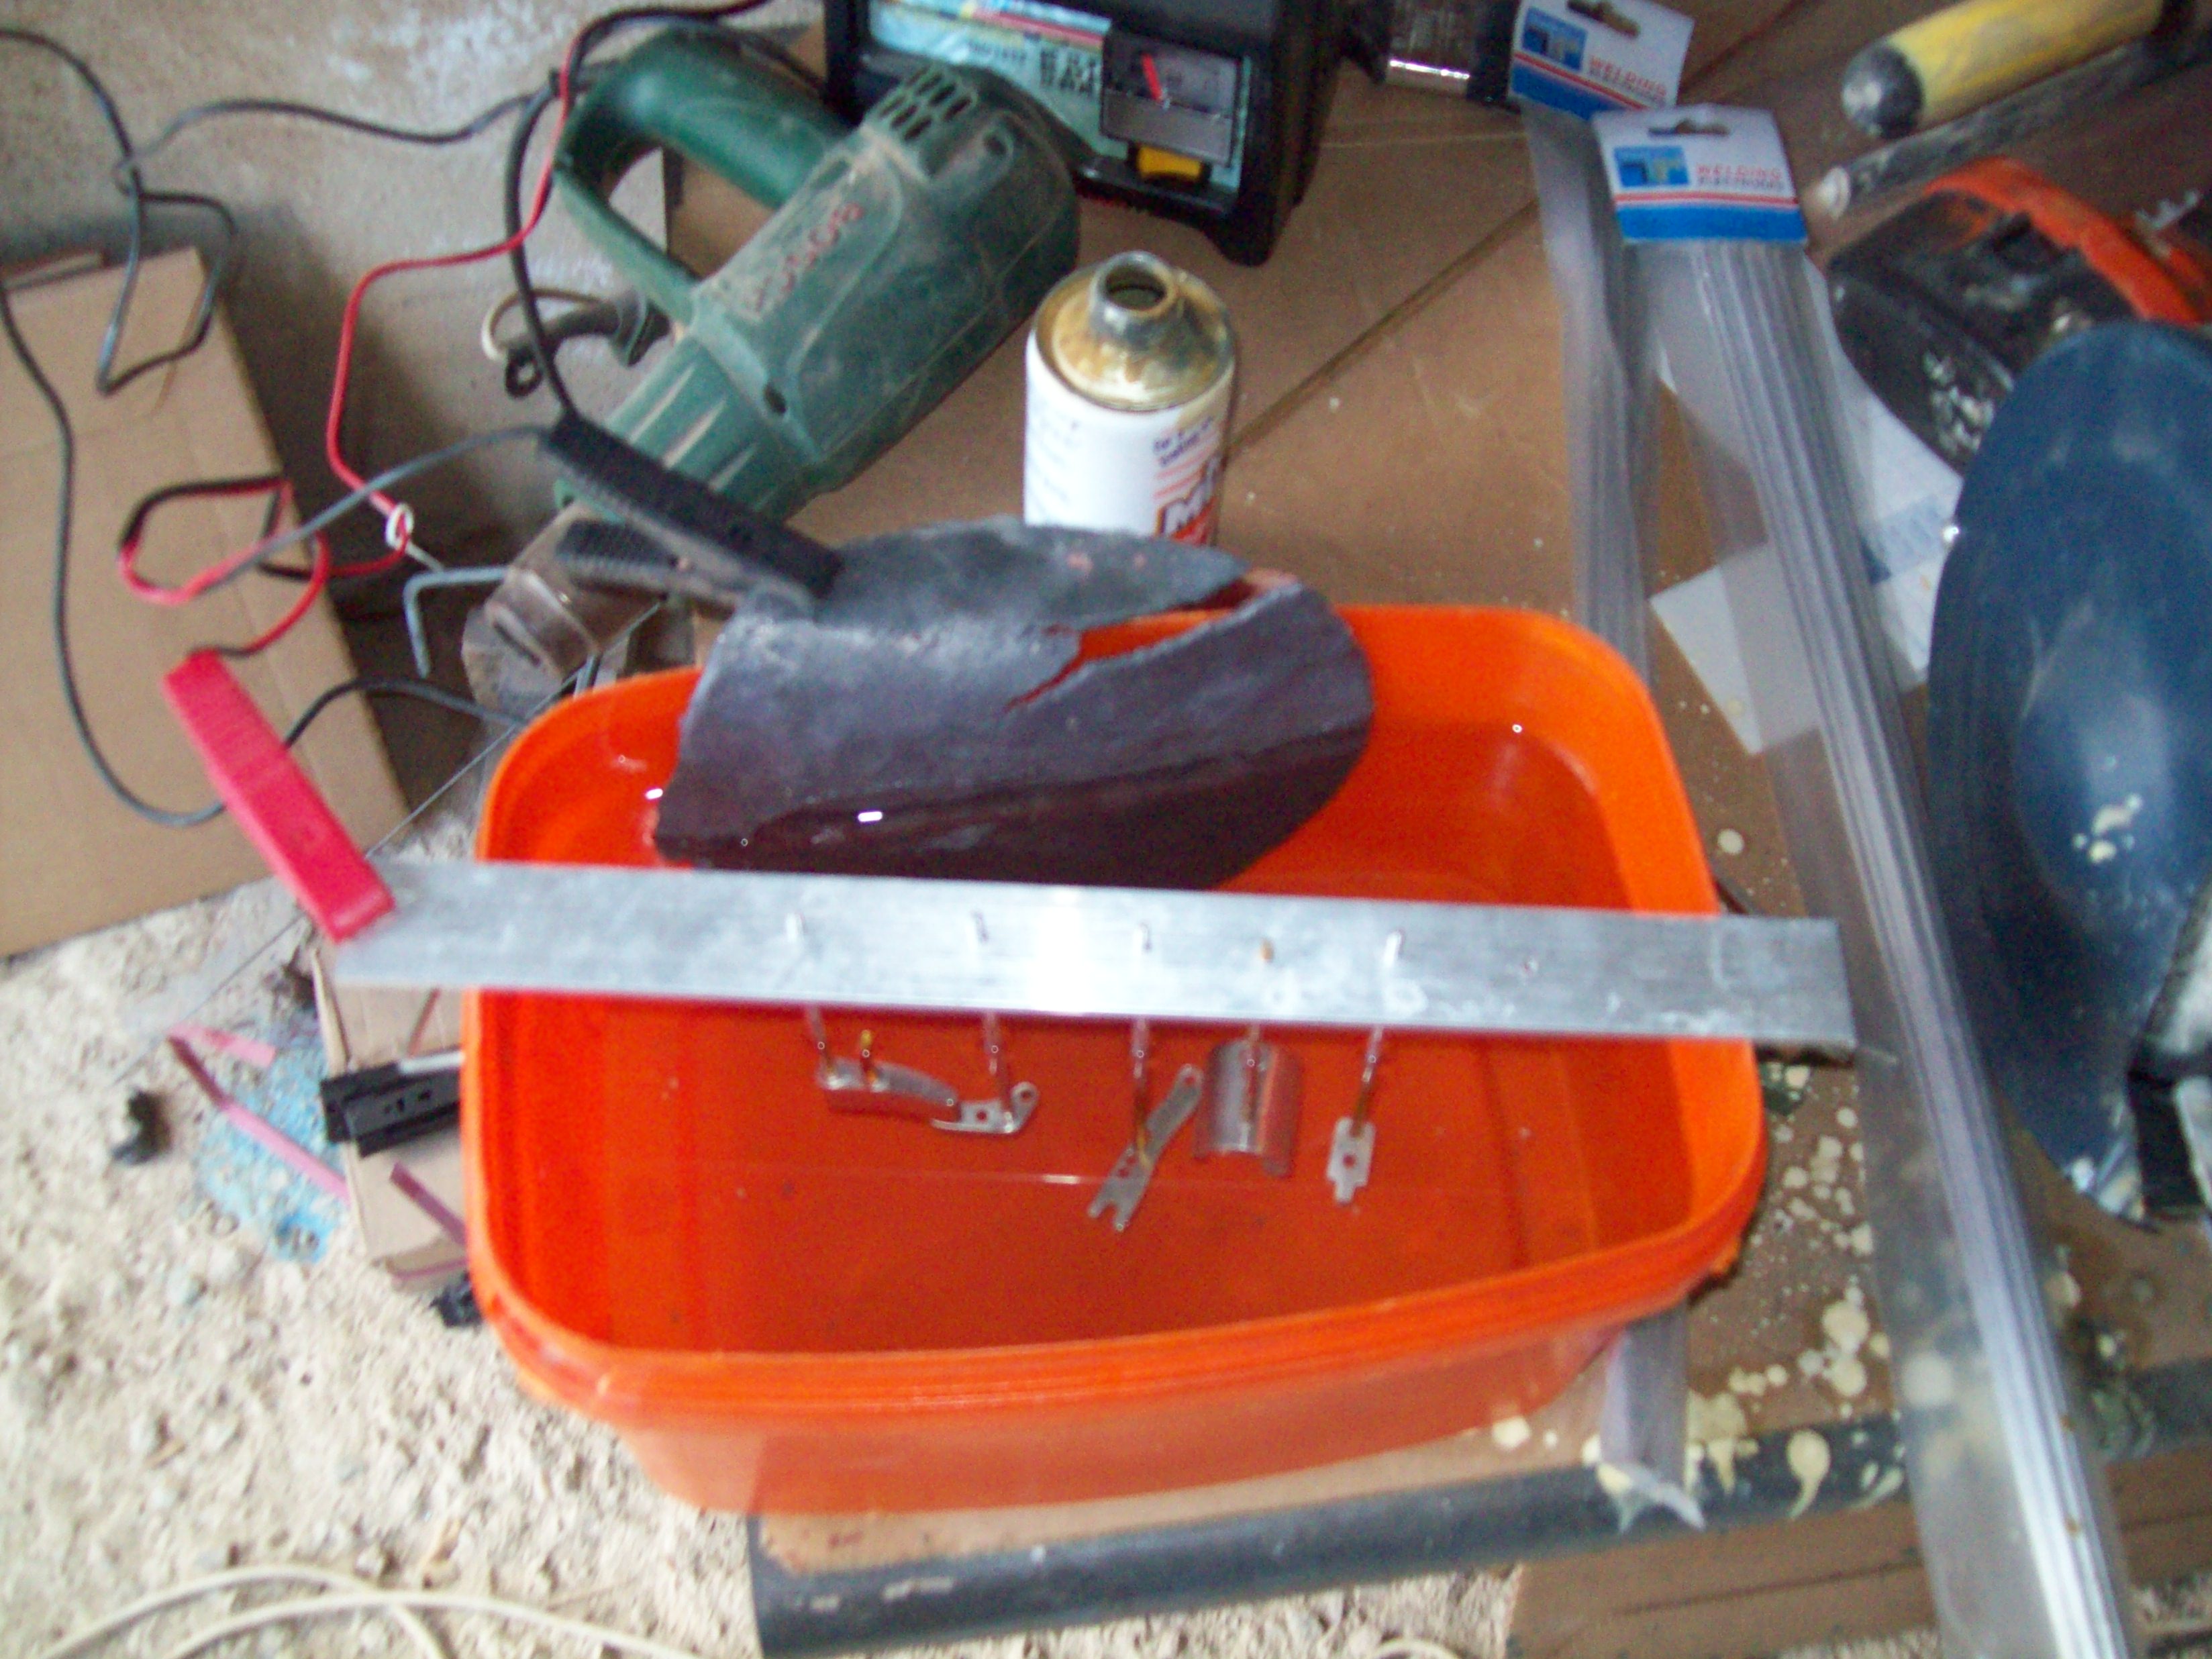 |
| Anodizing Process |
 |
| Glove |
 |
| Trimming the Glove |
 |
| Trimmed glove – securing stud positioning |
 |
| Almost Finished |
 |
| Complete Assembly |
 |
| Working Finger |
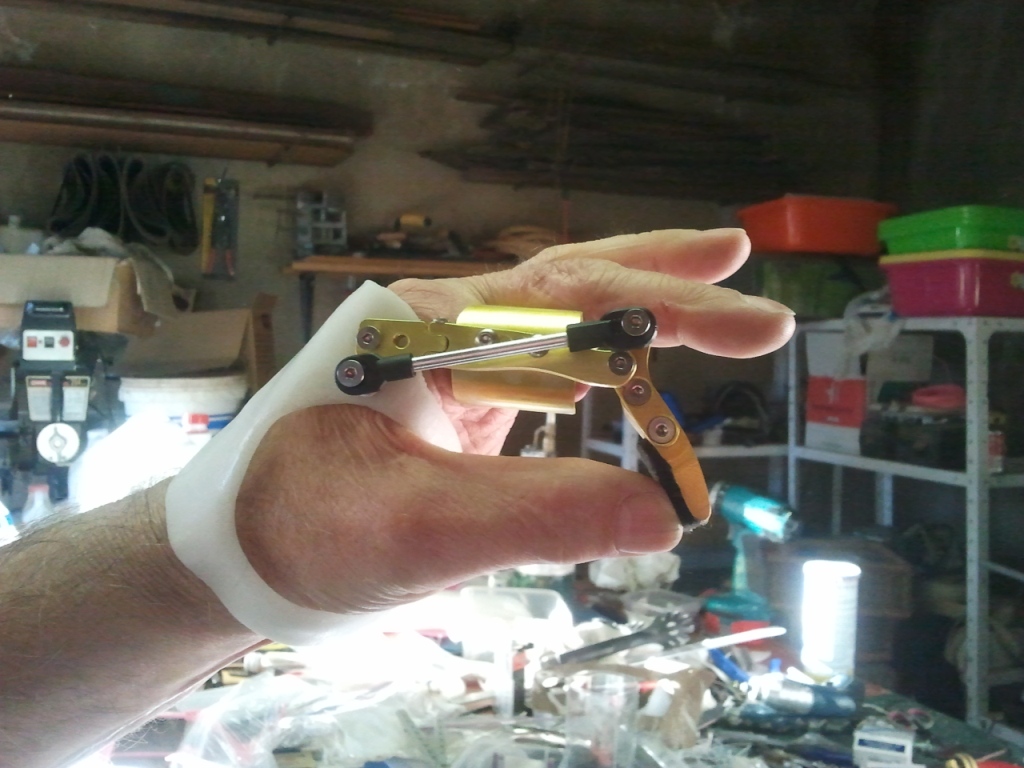
All that remains is to ‘decorate’ the glove, then train the brain to recognize and use the Robofinger.
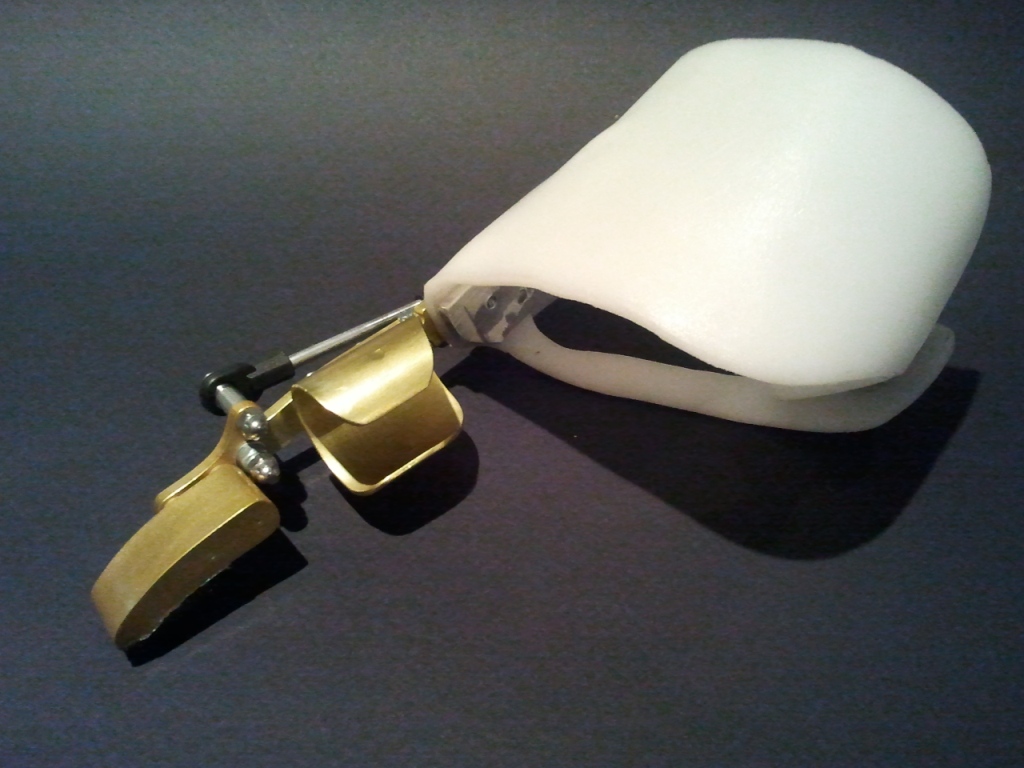
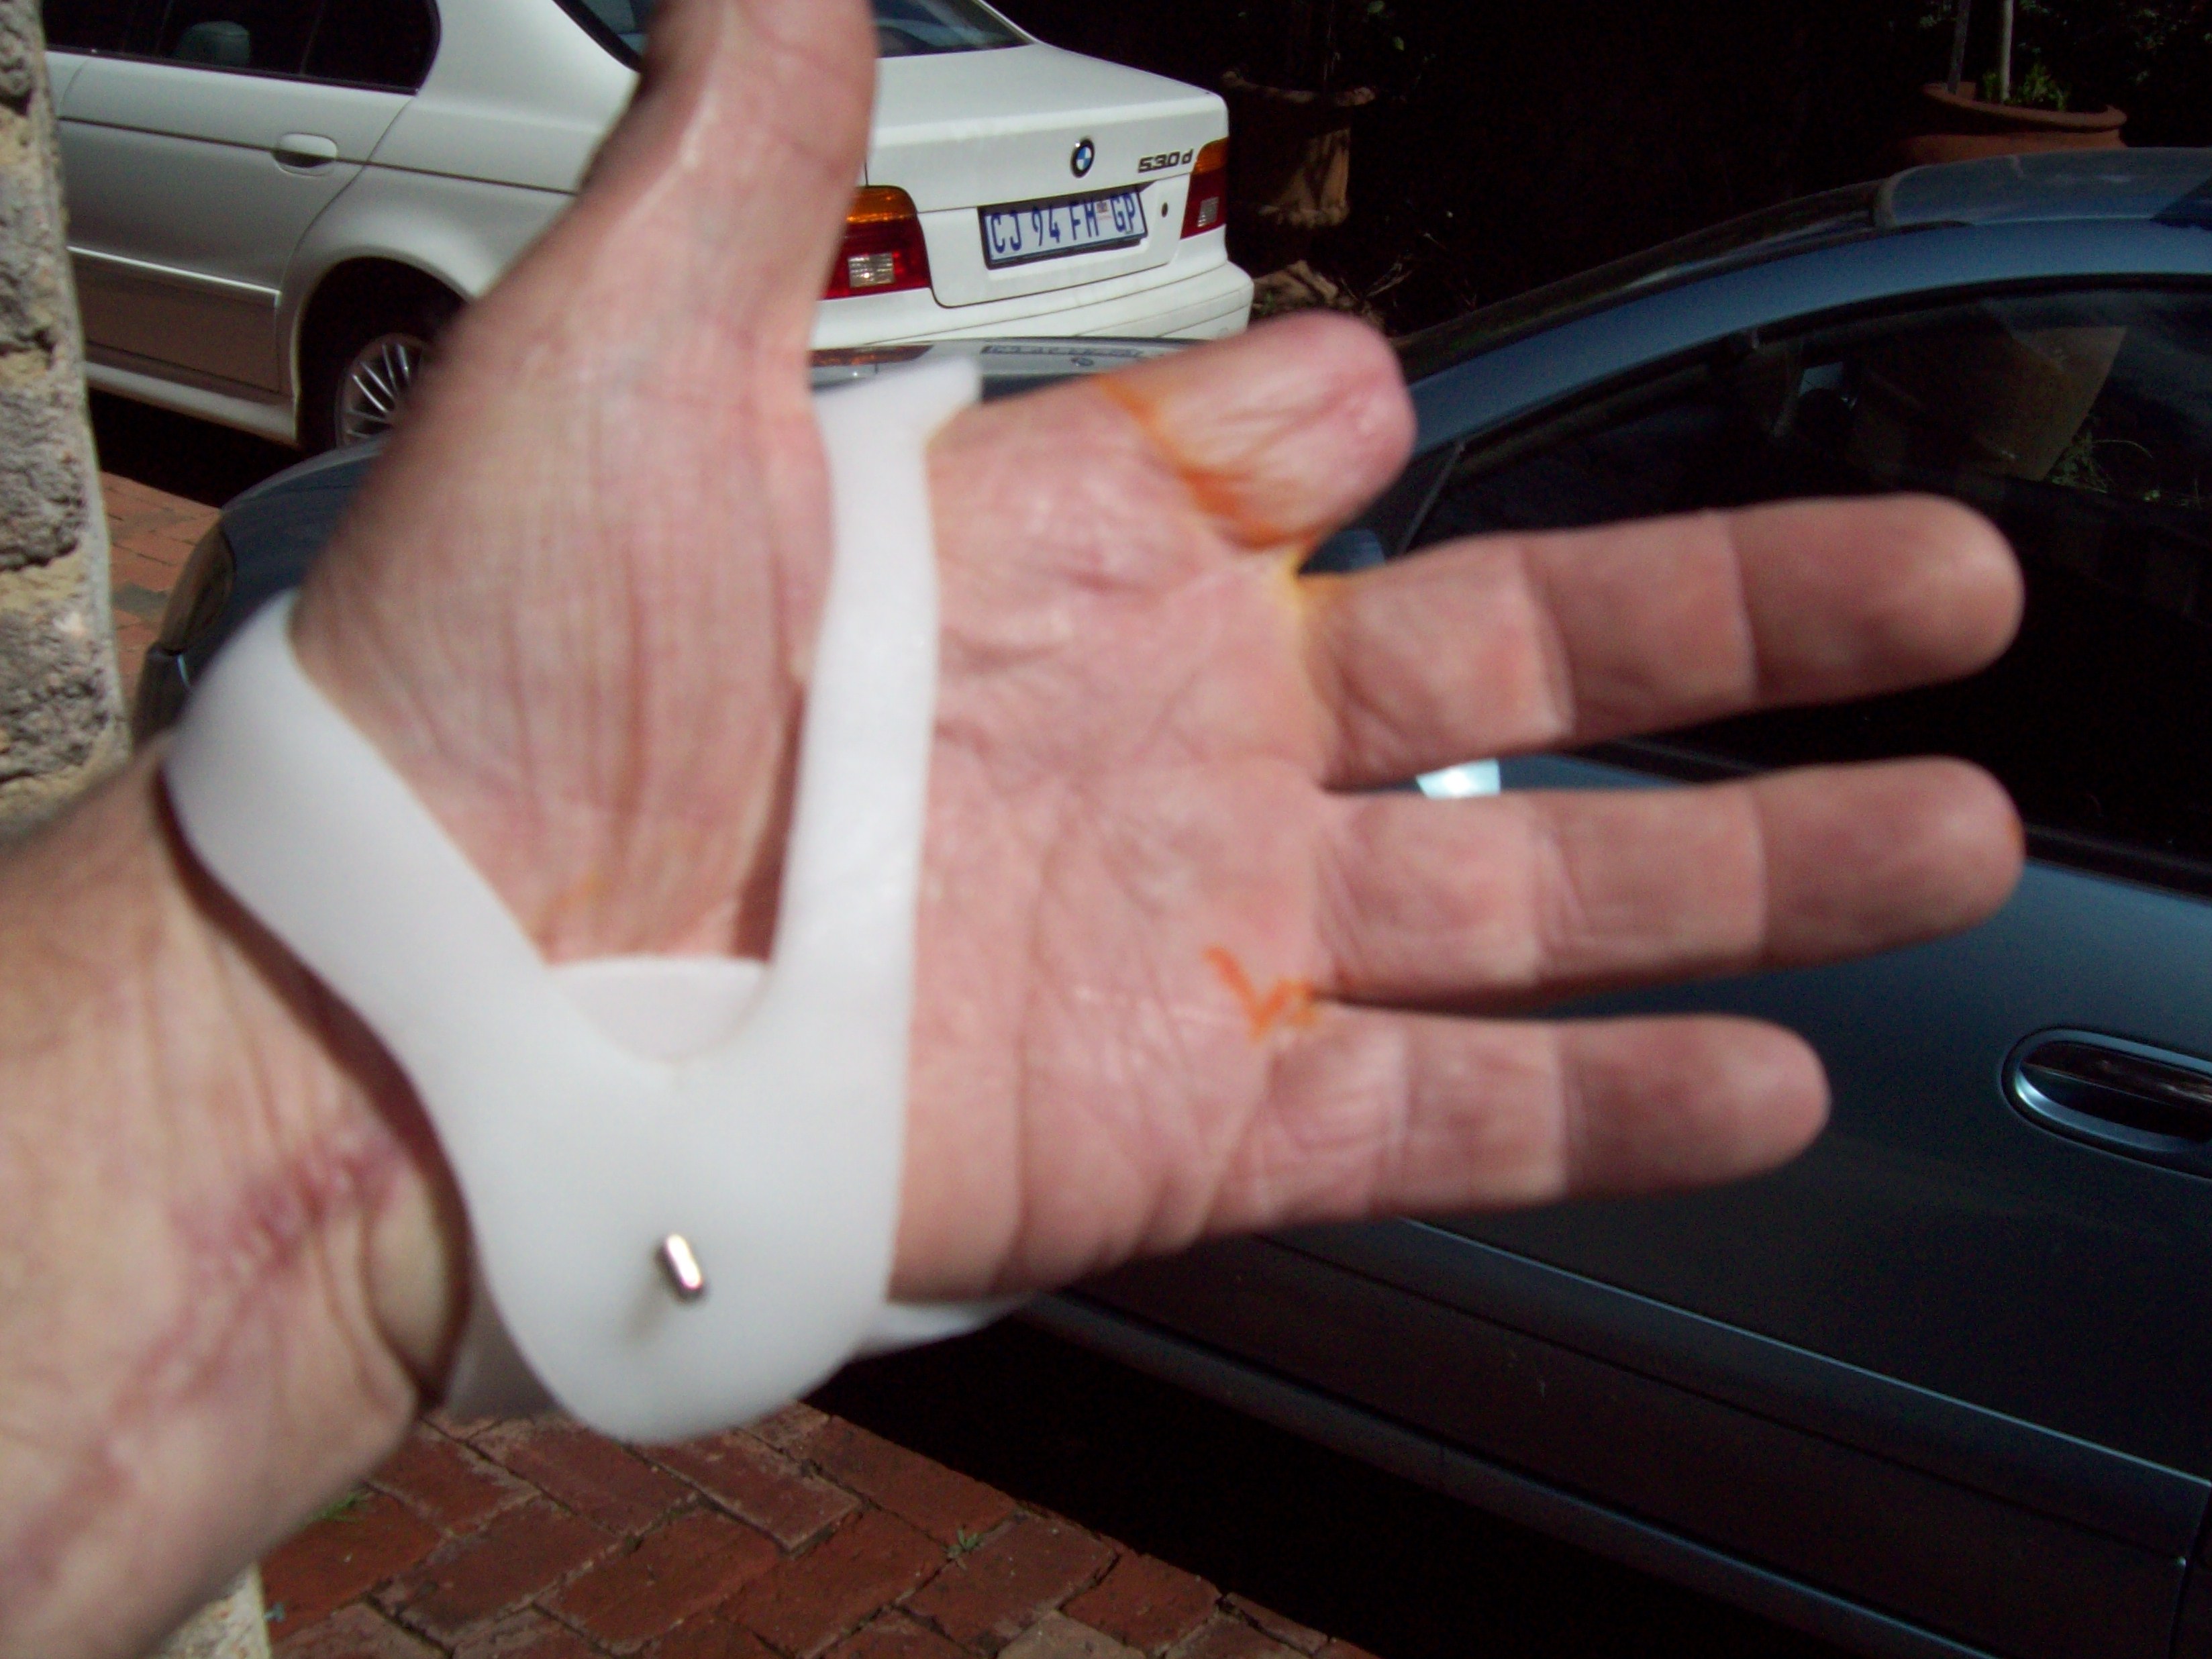
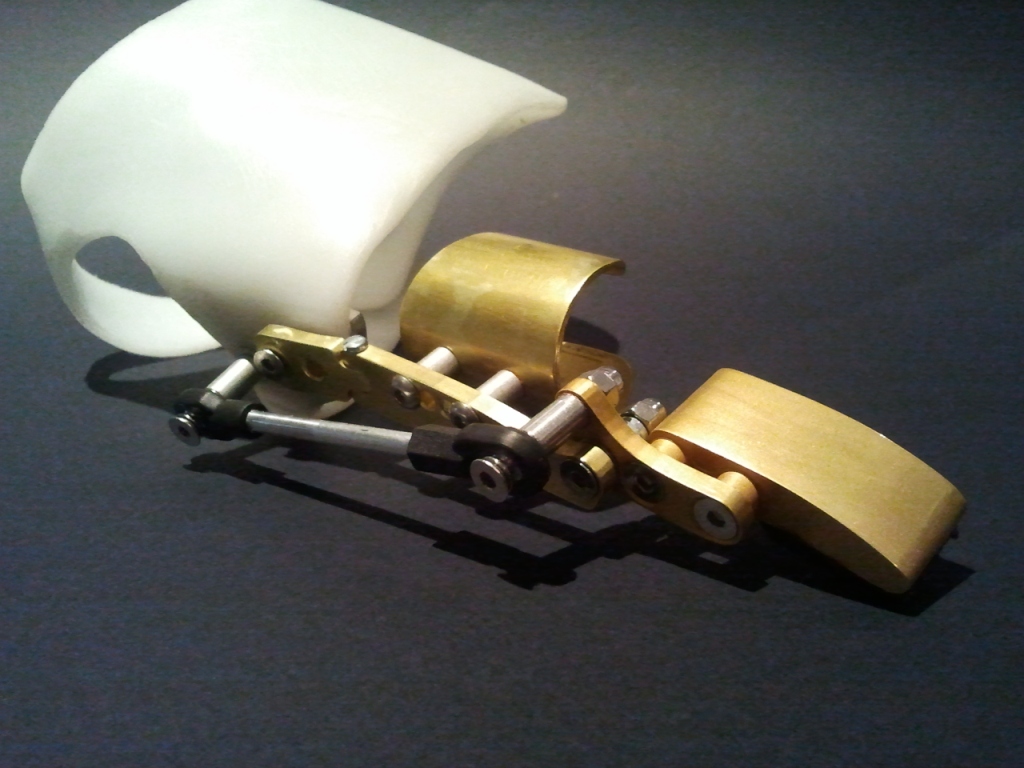
A Robofinger for Dave
This is Dave’s amputated finger.

Dave lost his finger due to a spider bite. A really poisonous nasty spider bite that made him incredibly ill. I have not posted any photo’s of what Dave’s hand and arm looked like after the spider bite or the surgery as they are very, very gory. But this is the end result. Dave lost most of his index finger on his left hand.
Robofinger for the left hand too? Yes. Robofinger has been developed for left and right handed people. Although Rich lost his fingers on his right hand and developed the Robofinger originally for the right hand, we have created it for lefties too!
Richard had to create Dave a special ring as the standard ring did not fit due to Dave’s stump being slightly shorter.

Richard had chosen a medium size finger and that was the picture we posted on our Facebook page as the one for Dave, but Dave required a small, so Rich had to start with anodizing first before putting the finger together. The anodizing is quite a lengthy process which took up a major part of the day.

While the parts were anodizing Rich started with moulding the hand cap for everything to attach to. It’s slightly different creating this hand cap to the one for the full Robohand as thumb and other fingers are still in tact.


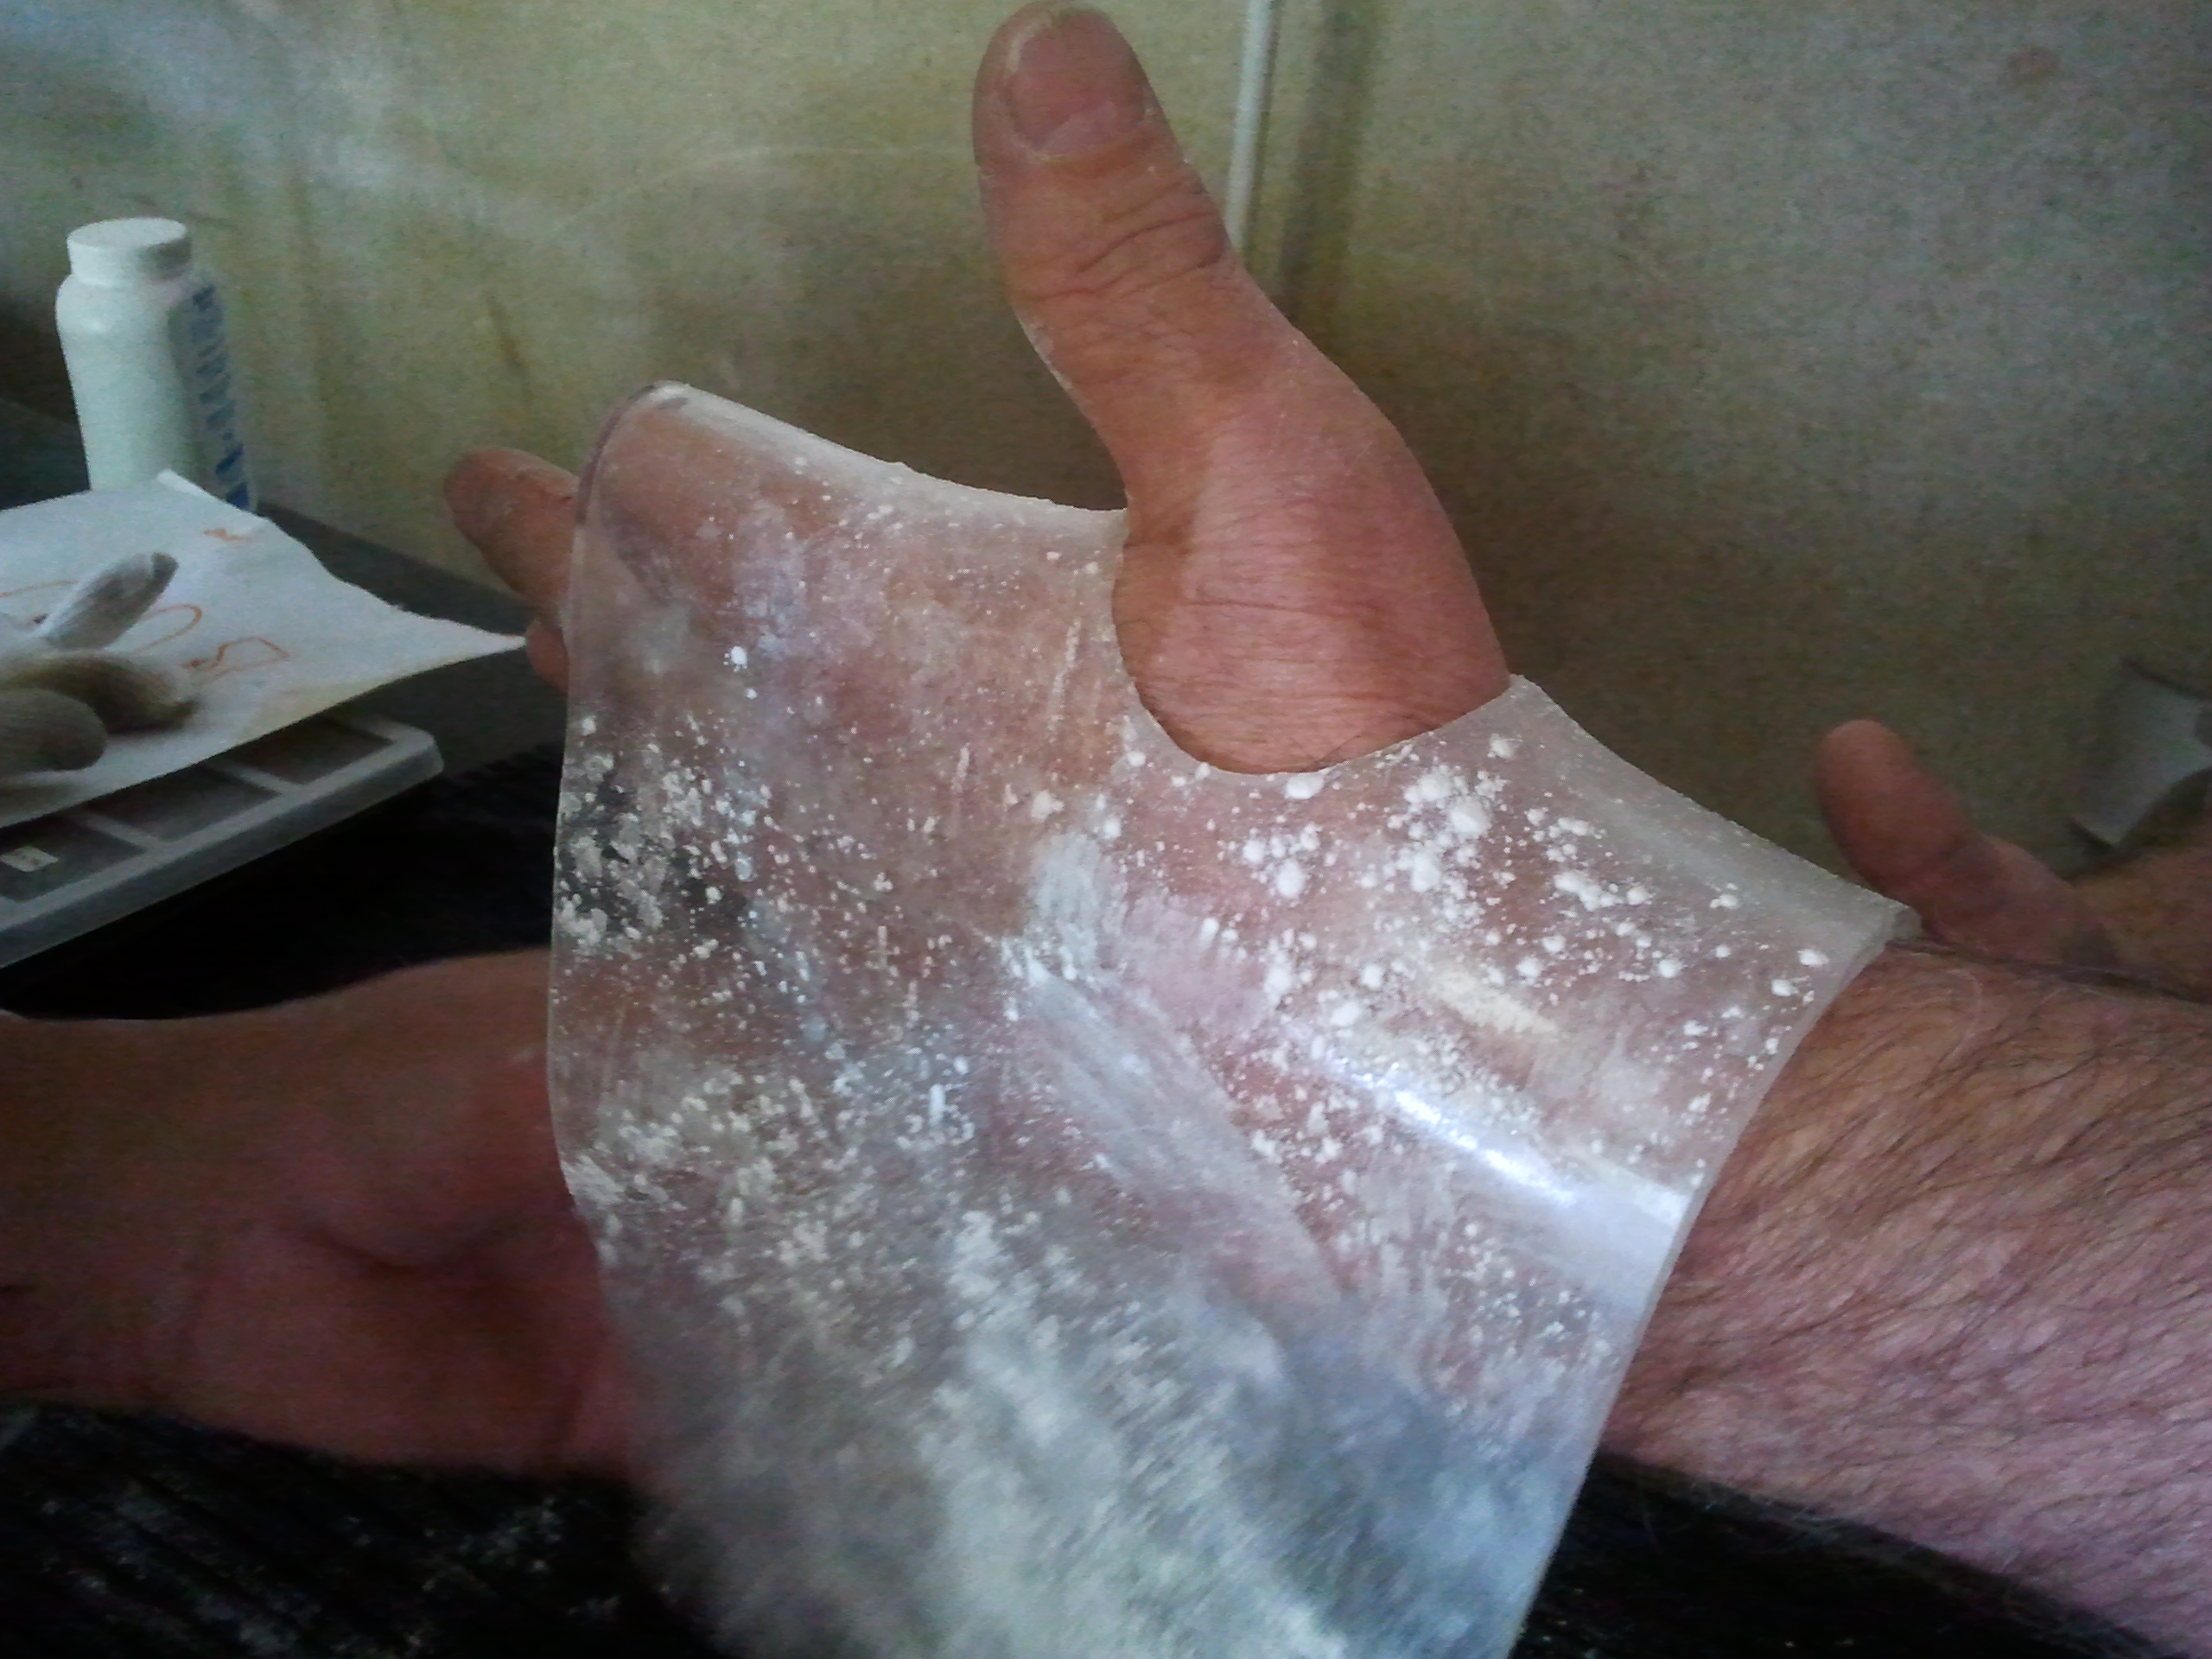


Preparing the hand cap is also a complicated and lengthy process. We advise this be done by an Occupational Therapist. The hand cap takes a lot of cutting, sanding and moulding. On, off, on, off, a tweak here, cut a bit off there, make sure the palm is not completely covered and so it goes. But finally Rich had it perfect.
Rich put the anodized parts together and so the Robofinger began to take its shape. While sitting with Dave, we discovered that he is an avid astronomer, a musician, a painter as well as holding his day job in Electronics. He is a very busy man so having a Robofinger is a top priority.


Once the piece began to take the shape of Robofinger Rich began attaching everything to the hand cap. Many fittings on and off to ensure no pinching and the fulcrum is correct.
After a long hard day for Rich, seeing Dave’s smile when he tried on his finished Robofinger was well worth it. Welcome to the Robohand Family Dave!